Introduction
This document describes the configuration and working of E-WMS Autopack
and SSCC Shipment Builder in Exact Globe Next, per product update 409.
Description
This document contains the following sections:
Autopack can be used when you need shipment labels during your sales order fulfillment process, but
when you do not want to use order picking using scanners.
Autopack and SSCC Shipment Builder offer a shipment label print solution without the need to use
scanners. From product update 406, the Autopack and Shipment Builder functionality is
available as independent functionality in Exact Globe Next menu Order, Entry,
SSCC Shipment Builder. When using SSCC Shipment Builder, other menu
paths apply than used for E-WMS.
From product update 407, serial/batch items are also supported in this process.
E-WMS Autopack or SSCC Shipment Builder will offer following functionality:
- configure items as 'WMS Autopack' item
- configure standard shipping units (WMS 'SKU types' is used) such as pallets or boxes, per
item
- buttons 'Autopack' and 'Shipment builder' in menu
WMS, To be processed, Order fulfillment, Control Center (or:
Order, Entry, SSCC Shipment Builder) provide Autopack advice
functionality and Shipment Builder functionality
- selecting one or more sales orders to be shipped in one shipment, with
automatic assignment of shipment number to the selected sales orders
- automatic creation of shipment structure: divide ordered quantities into in boxes and pallets
with automatically assigned unique SSCC numbers
- change shipment structure: create new pallets or boxes, move order
quantities between boxes and pallets
- label printing: printing shipment labels based on your SKU configuration
in the Shipment Builder, up to 3 different label types (inner SSCC/box, outer
SSCC/pallet, shipment)
- the SSCC numbers generated and printed by E-WMS or SSCC Shipment Builder are stored and can be used
for the Exact E-EDI delivery note message.
Following terms are used in Autopack:
- SKU: Stock Keeping Unit; a unit which holds one or more standard
sales units of an item. In this document this refers to the 'SSCC' unit,
being a pallet or a box. 'SKU' is the internal stock unit when using E-WMS
SKU Management, 'SSCC' is the shipping stock unit.
- SSCC: Serial Shipping Container Code, a
standard set by GS1, an 18-digit unique digit code used to identify
SKUs or shipping units in logistical processes
and in EDI messages between trade partners.
- The SSCC number is
build up as following:
- position 1: Extension digit, free assignable by the party that creates
the SSCC, can be for example a reference to a specific plant or branch of
your company
- position 2 to 17: the GS1 company prefix (in most cases 5 or 7
digits), followed by a sequence number,
making this SSCC number globally unique
- position 18: computed control digit (modulo 10 method)
- The GS1-128 (EAN128) application identifier '00' is added as prefix to the SSCC number in
GS1-128 bar codes, but is not part of the SSCC number itself - just of the
barcode
- Outer SSCC: a unit which is commonly also the transport unit, like a
pallet, and may contain several inner SSCC's
- Inner SSCC: a unit which is commonly used to build an outer SKU,
for example a box or a case
- GS1: an
international
organization dedicated to the standardization in the national and
international demand- and supply chain. GS1 regulates for instance the
standards of bar coding. GS1 was formerly known as 'EAN International' or 'Stichting
EAN' (Netherlands).
Prerequisites
Following is required to use WMS Autopack or SSCC Shipment Builder:
License requirements
- One of following Exact Globe Next modules:
- SE1380 E-WMS I (or older license SE5700 Pick-IT)
- SE1386 E-WMS Lite
- SE1387 SSCC Shipment Builder (available from product update 406)
- BarTender labeling software.
The 'BarTender
Automation' edition would be sufficient, when used only for this purpose
and when printing labels directly from the workstation.
When you plan to use E-WMS hand terminals and print labels from hand
terminals in the future, it may be better to purchase the 'BarTender
Enterprise Automation' edition.
See
WMS system requirements
for more details.
Practical requirements
- Bartender needs to be installed on any workstation where labels are
printed (where the control center will be started), or the BarTender
'server' method can to be used (requires other BarTender edition).
- The label printer has to be supported by BarTender (see
printer list of Seagull Scientific)
- Use the printer drivers provided by Seagull Scientific, experience has
shown that these can perform much better
- You need labels, check if your
labels would have to support specific environmental requirements (cold storage requires other quality labels)
- BarTender label layouts based on SQL views. Consultancy may be
required,
sample labels are available
- When not using the BarTender
'server' method:
- label layouts are linked to one specific Exact Globe Next company.
When using Autopack in two or more companies, you need to create copies of the
BarTender lay-outs and manage these separately.
- The views used in the BarTender labels need to be created in each Exact
Globe Next company (SQL database) used for SSCC Shipment Builder.
Rules and restrictions
- From product update 407, Autopack can be used for batch items or serial number items.
In release 406 and earlier, serial/batch items are not supported
- Autopack will only use the default location of an item, therefore
sufficient stock on this location is required (when using locations), also
for serial/batch stock
- SKU stock is not supported in Autopack/Shipment Builder
- Autopack cannot be used in combination with order picking on E-WMS hand
terminals
- When an Autopack advice is generated for serial/batch items,
serial/batch numbers will be automatically assigned to SSCC number, starting
with the lowest S/B numbers in the lowest SSCC numbers
- Items to be used in Autopack must be configured as an 'WMS Autopack' item
(E-WMS setting in
item maintenance)
- The WMS settings 'Multi layer SSCC' and 'Autopack' must be enabled in
WMS SSCC settings, to enable the Autopack functionality
In a SSCC Shipment Builder license (SE1387), these settings are enabled by default,
and not visible.
- The shipment number is assigned when selecting one or more sales orders
to be 'auto packed', and can not be changed afterwards
- It is not possible to include these SSCC numbers on the Exact
Globe Next delivery note layout, as mentioned in document 'WMS
known issues'. Instead, the 'processing report' could be changed to act
as 'SSCC attachment'.
- Exact Globe Next enrichment is not supported. Enriched order lines
cannot successfully be processed in the Control Center.
- You cannot use external or existing SSCC numbers with Autopack
functionality. Autopack will always generate new SSCC numbers, based on the SSCC
number settings.
Installation
Exact Globe Next and BarTender
When downloading and installing Exact Globe Next, all required parts are
available, except for BarTender. BarTender is not part of Exact and needs to
be purchased and installed separately, and consists of a license service (to be installed
once) and the client installations for designing and printing. A BarTender trial
version can be downloaded from
Seagull Scientific,
but using a trial version of BarTender is not supported (though it may work).
When using the BarTender
'server' method, this document applies: setting up hand terminal label
printing
BarTender labels
You can configure up to 3 different labels: one for inner SSCC's (cases), one for
outer SSCC's (pallets), and one for the shipment. Designing these labels with bar codes and
texts is not part of this document, but sample labels and SQL views are provided
in document
BarTender - WMS integration: mandatory fields and samples.
You can use these views and labels to get started. Please remember to
change in
each label lay-out file: server name, database name, SQL login and printer; since these labels are
build with a default configuration. In you are using these labels in a network
environment, you may save the labels in a shared folder. Following sample
lay-outs are provided: eWMSAutopackBox.btw, eWMSAutopackPallet.btw and
eWMSAutopackShipment.btw.
SQL views
When using the BarTender 'client' method (default method for these SSCC
labels), then the label lay-outs are based on SQL views. Some field names in these views are
mandatory, besides that, you are free to add any fields you need. To access the
data in the BarTender labels, you may configure a dedicated SQL user. That way,
you do not need to grant rights to each user printing these labels.
Following sample SQL views are provided: eWMSAutopackBox.sql,
eWMSAutopackPallet.sql and eWMSAutopackShipment.sql.
Setting up labels in WMS
The labels created in step BarTender labels need to
be linked in Exact Globe Next menu System, E-WMS, Labels,
for each of the label type you want to use. If you are using labels for each
box, pallet and also separate shipment labels you will need to configure all
three labels here. If you are using only pallet labels, you only need to
configure one label, linked to 'application': "SSCC - Autopack: Pallet". It is
possible to configure multiple label lay-outs (with each also possibly a
different SQL view) for the same 'application' step, these will all be printed
subsequently.
Please see document
E-WMS menu: System, E-WMS, Labels for details on how to create a label
configuration.
CONFIGURATION
General Autopack settings
Autopack is enabled in Exact Globe Next menu System, General, Settings, WMS SSCC.
Please see document
E-WMS settings: WMS SSCC for more details.
The following settings have to be changed:
- SSCC numbers: enabled
- Use multi-layer SSCC: enabled
- Number settings configured to generate SSCC numbers
- Use Autopack: enabled
Configure items for Autopack
There are three important factors for an Autopack item:
- 'Use AutoPack' must be enabled
- Only from release 407, serial- and batch item are supported.
Earlier releases did not include automatic assigning of serial- or batch numbers
into box- and pallet SSCC numbers.
- the item must have a valid GTIN/EAN13 number (14 digits) when you want
to print valid UCC/EAN128 bar codes (may also require changing the SQL
views). The views will default assume that the item/supplier field 'ean
code' contains a 14 digit GTIN/EAN code which can be included in the SSCC
labels.
- a default warehouse location must be configured for the item in the used
warehouse, and that location must have sufficient stock (when you are using
warehouse locations in Exact Globe Next)
- SKU stock is not supported in Autopack
An item must be enabled as 'Autopack' item before it can be used in Autopack.
Use the WMS button in item maintenance, for instance in Exact Globe
Next menu Order, Items,
Maintain.
When sending sales order lines to be auto packed, the quantities will be
fulfilled from the item's default location in the shipping warehouse;
Therefore it is necessary to have sufficient free stock available on this
default location, before starting Autopack.
Configure SSCC types
Exact Globe Next menu WMS, Setup, SKU, SKU
types
allows you to configure your basic SSCC types = pallets or cases, or other
logistical units.
In SSCC Shipment Builder license (SE1387), this is menu
System, E-WMS, SKU types.
These SKU types will be linked to your Autopack item in the next step.
Press New to create a new SKU type:
SKU type
Assign a code to this SKU type (10 characters, alphanumerical)
Description
Give the SKU type a clear description (pallet- or
box type).
Note: when changing the description of an existing SKU type, this change will
not be replicated to already existing 'SKU configurations per item'.
Inner SKU
Enable this setting if this packaging type can be part of an outer SKU, so in
case of boxes for example.
Dimensions (height, width and depth)
Dimensions are used in
WMS SKU Management
but not in Autopack. These can be filled for your own information but are
not required for Autopack.
Configuring SKU per item
Exact Globe Next menu WMS, Setup, SKU, SKU per item
(or in a SSCC Shipment Builder (SE1387) license: menu System, E-WMS, SKU per item)
allows you to configure the structure of an item; how many sales units
are in a box, and how many boxes are on a pallet. Based on this structure linked
to your item, SSCC numbers (box and pallet numbers) are automatically generated
when starting 'Autopack' for a selection of sales orders. One item can only have
one active Autopack configuration. A configuration can be just an inner SKU, just an
outer SKU, or a combination of both.
Please see document
maintenance of SKU per item for more details.
USING AUTOPACK
Start Autopack
Create one or more sales orders with 'Autopack enabled' items. Authorize and
confirm these orders when required.
For E-WMS or E-WMS Lite, start Exact Globe Next menu
WMS, To be processed, Order
fulfillment, Control Center.
For SSCC Shipment Builder SE1387, start Exact Globe Next menu
Order, Entry, SSCC Shipment Builder.
Because Autopack is enabled, this Control Center now shows:
- a new column Shipment, which will be filled with a unique
shipment SSCC number when the Autopack button is used,
- button AutoPack, to generate the shipment structure and SSCC numbers for the selected sales
orders, and
- button Shipment builder, which will become active after Autopack
has been started.
To combine several orders in one shipment, you can select these orders using CTRL- or
SHIFT when selecting the orders and then press AutoPack.
A report will show when the Autopack report setting was enabled.
In release 406 or earlier, this is a basic report showing only the status
'Autopack generated' per order. From release 407, the report shows the shipment
structure on SSCC and item or serial/batch level. You can read more about
this report in
this document.
After this step, the items have been 'adviced' from their default locations, and
Autopack automatically generated SSCC numbers for inner and outer SSCC's, based on the SKU
configuration for each item.
Also a shipment number has now been assigned to the selected sales order lines.
All selected orders have the same shipment number.
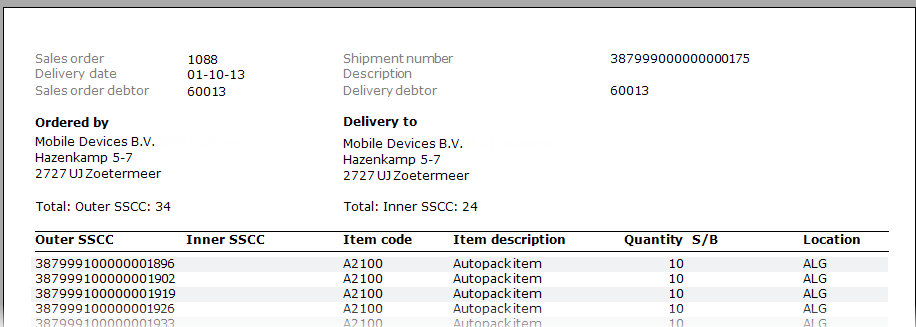
Shipment Builder - editing a shipment
The Shipment Builder will now open automatically showing the generated
shipping configuration as a tree structure.
The quantities from the sales order lines were automatically assigned to inner
and/or outer SSCC's.
In this sample, Item 1000K is stacked directly on a pallet (350 units per
pallet, 500 to be fulfilled).
Item 1000H is stored in cases of 4 sales units, with 25 cases on a pallet.
The shipment tree has following structure:
- Shipment SSCC number (811234100000000103)
- Outer SSCC number (811234300000000244, 811234300000000251,
811234300000000268)
- Inner SSCC number (when used; 811234500000000279,
811234500000000286)
Using the '+' and '-' indicators in the tree, you can expand or collapse a level.
You can still edit this default shipment structure, SSCC's can be removed or added,
and quantities can be 'dragged' to another SSCC or outside the shipment
structure.
You can use buttons New SSCC,
New Inner SSCC and
Delete to manage the shipment structure.
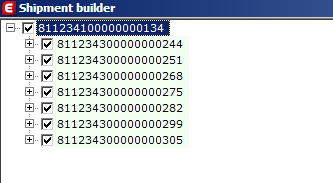
New SSCC
The button 'New SSCC' Generates a new outer SSCC number and adds this to the tree. This sample shows a collapsed tree structure,
showing only outer SSCC's (pallets), after pressing New SSCC a new pallet
number has been added:
New inner SSCC
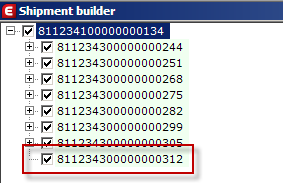
The button 'New inner SSCC' creates a new inner SSCC number and adds it to the tree.
When you selected the shipment number while pressing New Inner SSCC, the
new SSCC will be added to the bottom of the tree on 'outer SSCC' level. You will have to drag the new
inner SSCC to an outer SSCC ('place the box on a pallet').
When you selected an outer SSCC while pressing New Inner SSCC, the inner SSCC
will be added in the level under that outer SSCC.
Sample: adding two new boxes to the pallet (..312) just created, pressing New
Inner SSCC two times:
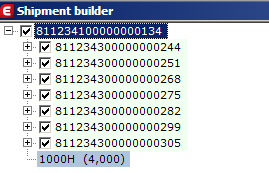
Adding or moving items and quantities
All quantities to be fulfilled were automatically assigned to inner and/or
outer SKUs. When adding new SSCC's, there would be no item quantities available
(unassigned) to use in the new SSCC's.
However, after adding new SSCC's you can drag quantities from one SSCC to
another. For example, moving 4 units of item 1000H from box ...1511 to box
...1597:
Select the source item and hold the mouse button, then drag this item to the
target SSCC and release the mouse button:
Please make sure that you maintain the required structure. When an item has
both an outer and inner SKU, make sure the quantities you re-assign are always
placed into an inner SKU and not in an outer SKU directly.
Deleting SSCC's
You can delete existing SSCC's from the tree structure by using the button
Delete. Select the SSCC number to delete and press
Delete.
Attention: the selected SSCC and all SSCC's within it's sub tree, are deleted
without warning.
When deleting a SSCC which holds a quantity, this quantity will be placed
outside directly under the shipment number in the tree:
You will still have to create the appropriate SSCC structure for this
remaining quantity. As shown above, you can drag this quantity into an existing
SSCC.
When you close the Shipment Builder and save your changes, you can re-open
the same tree by selecting status 'Validated' in the Control Center,
selecting the appropriate sales order and pressing the
Shipment Builder button.
Shipment Builder - printing labels
Use the button Print labels to start label printing for the entire
shipment structure. The printing should start after a few seconds.
In case no labels are printed, please have a look at document
WMS SKU Management: troubleshooting label printing, the last step also applies to
AutoPack.
For testing, you can use a PDF printer in the label lay-outs or by assigning a
PDF printer in the WMS label configuration.
Please keep in mind that BarTender licensing is based on used number of
printers, when switching printers you may have to manage this situation in the
Seagull License Server.
Related documents